Tutorial 1 - Working with Jupyter Notebooks

![]()
Introduction to Jupyter Notebooks
Jupyter Notebook is an open-source web-based interactive computational environment, designed for sharing documents that contain code, text, equations, and visualizations. It is part of Project Jupyter, which also includes Jupyter Lab - an updated version of Jupyter Notebook with enhanced capabilities.
Jupyter notebooks are documents that contain both code and text elements, such as equations, visualizations (i.e., figures and graphs), links, and similar related elements.
The name Jupyter does not really relate to the largest planet in the Solar system (spelled Jupiter), but instead, it is a coined word from the three core programming languages supported by Jupyter notebooks: Julia, Python, and R.
Jupyter Notebook was built upon an older IDE for Python called IPython.
The recommended user interface for this course is Jupyter Lab, since it offers advanced functionalities in comparison to Jupyter Notebook, such as access to a terminal, interactive widgets for exploring data, it allows multiple views into the same document, quick switching between opened files, etc.
Both Jupyter Lab and Jupyter Notebook are part of the Anaconda distribution, therefore if you have installed Anaconda on your computer, they will also be installed. And if you don’t have Anaconda installed, you can install Jupyter Lab and Jupyter Notebook separately as any other package, e.g., pip install jupyterlab.
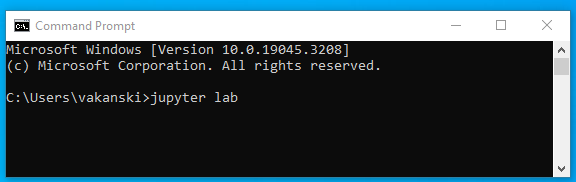
The Jupyter Lab environment can be started by running the command jupyter lab in the Command Prompt on Windows systems, or in a shell or terminal window on computers with other operating systems.
Jupyter will open in your default browser, or in a new tab if the browser has other open tabs, at the following URL: http://localhost:8889/lab. Localhost is not a website, it only indicates that the content is being served from your local machine. Therefore, Jupyter can be run on a computer without Internet access, or it can be run on a remote server accessed through the Internet.
The Jupyter Lab environment on my computer looks like in the figure below. The start-up directory for the Jupyter Dashboard can be changed to a preferred directory.

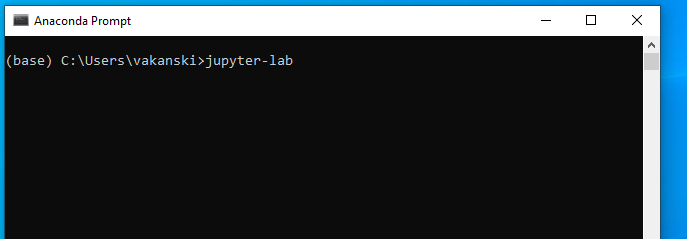
It is also possible to open Jupyter Lab from the Anaconda Prompt, by typing jupyter-lab in the command line.
And probably the most convenient way is to create a shortcut to Jupyter Lab on your desktop for direct access.
Creating a New Notebook
Now, let’s create a new notebook. One way to do that is to click on the File tab in the top menu, then select the New button, and in the drop-down menu choose Notebook. Note that the New button also have options to open a new console or terminal (which allows to run shell commands directly in your browser, instead of the Windows Command Prompt), or create a new text file, markdown file, or Python file.

In the newly opened window you will be prompted to select the kernel for the notebook. We can select the default Python 3 kernel. The next section explains more about the kernels in notebooks.

Or, an even simpler way for creating a new notebook, is to directly click on Notebook Python 3 (ipykernel) icon on the Jupyter Dashboard.

The newly created notebook will look like this.
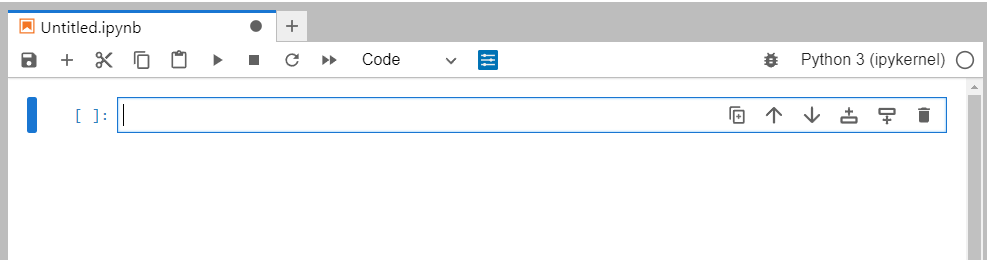
The default assigned title to new notebooks is Untitled. You can see the title at the top of the page.
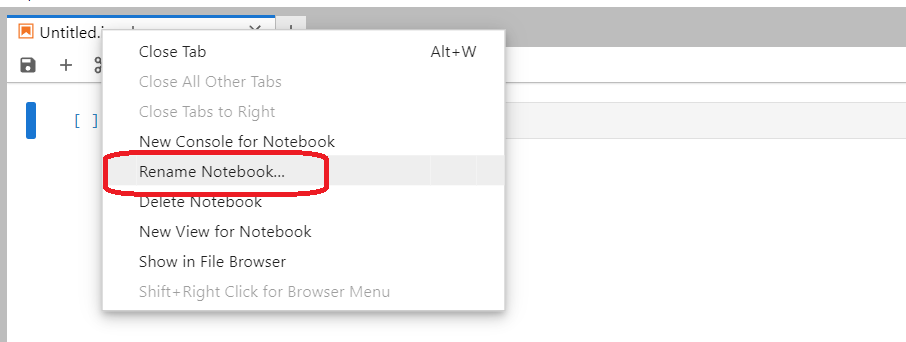
To change the title into a more descriptive one, right-click on the word Untitled, in the drop-down menu select Rename Notebook.., and enter the name Hello_world, for example.
The new title of the Notebook should now show at the top of the page. Also, in the left-side panel you will see the new notebook Hello_world.ipynb listed in the current working directory.
The extension for Jupyter Notebook documents is .ipynb, which is an acronym for IPython Notebook.
Cells in Jupyter Notebooks
Jupyter Notebooks organize codes in cells. Our newly created notebook has one empty cell in it.
The cells use the Python 3 kernel that we chose when we created the notebook. The used kernel for Python code execution in Jupyter Notebooks is also called IPython kernel. The kernel allows to execute Python code in the cell.
A cell is a container for code that is to be executed by the notebook’s kernel, or text that is to be displayed in the notebook.
A kernel is a program that executes the code in a cell. Jupyter Notebook has a kernel for Python code, but also there are other kernels available for other programming languages.
Let’s give it a try and write print('Hello world!') in the cell. To execute the cell, we can either click on the Run button in the toolbar on the top of the screen, or we can press the Shift and Enter keys on the keyboard.
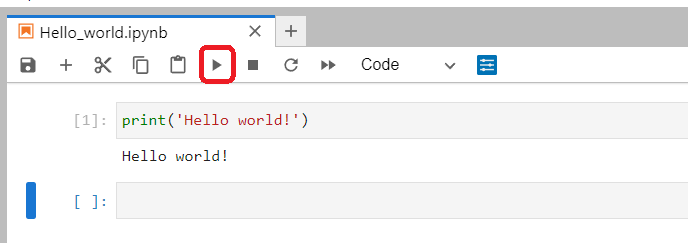
When you run a code cell, the kernel executes the code and the output of the code is returned back to the cell to be displayed.
Notice that each cell has a number, enclosed in square brackets [1] to the left of the cell. If we write another statement in the next cell, the order of the cell will be automatically changed to [2]. But also, if we run the first cell multiple times, each time the cell is executed the cell number will increase. This way, in a program with many cells, we can tell the order in which the cells were executed.
Using multiple cells in a module allows to separate the code into logical groups for improved code readability.
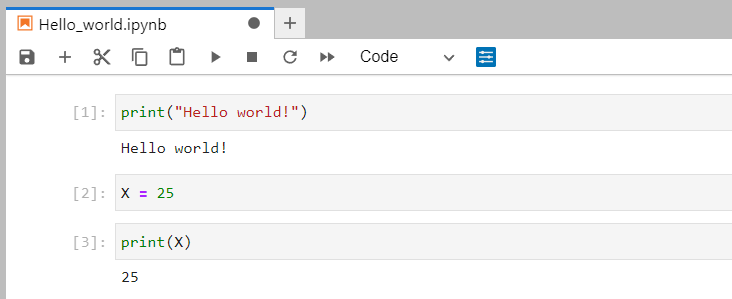
Furthermore, the variables and imported packages are shared across cells. For instance, if we define a variable X in cell 2, we can invoke the same variable in cell 3. Therefore, importing libraries or defining functions needs to be done only once in a notebook, and they are afterward shared by all cells in the notebook.
Jupyter Lab User Interface
Drop-Down Menus
Jupyter Notebooks have the following drop-down menus on the top of the screen:
File: allows to create a new notebook, open existing notebooks, or save, download, and close notebooks.
Edit: have cut, copy, and paste cells buttons, and also allows to delete, split, merge, or reorder the cells in a notebook.
View: offers commands for toggling the visibility of the header, toolbar, and line numbers.
Run: have various commands for running cells above or below a cell.
Kernel: is for working with the selected kernel, allowing to restart the kernel, reconnect to the kernel, shut it down, or change the kernel.
Tabs: provides a tabbed interface to manage and navigate open documents and interfaces.
Settings: has access to configuration options and preferences for customizing Jupyter Lab.
Help: to get help about Jupyter Notebooks, learn about keyboard shortcuts, or access links to reference materials.
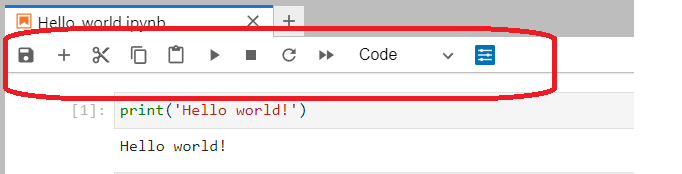
Beside the top menus, several functions that are the most commonly used can be invoked from the top toolbar. If you hover the mouse over the icons, a brief description will show up. The icons include: save, insert a new cell, cut, copy, and paste selected cells, run cells, interrupt the kernel, restart the kernel, select the cell type, and render with panel.
Left Sidebar in Jupyter Lab
The left side-bar or the left-side panel in Jupyter Lab contains several tabs, including:
File browser: shows the content of the current working directory.
Running terminals and kernels: lists the terminals and notebooks that are currently running (shown below). It allows to shut down notebooks and release computational resources.
Table of contents: allows to navigate the structure of the notebook.
Extension manager: for managing third party-extensions.

Note that even if we close the tab of a notebook, the kernel will continue to run in the background, and it needs to be shut down to be fully “closed”.
Otherwise, Jupyter Notebooks are auto-saved pretty frequently (every 120 seconds), and it is rare to lose data.When the notebook is saved, aA checkpoint file is created in a subdirectory of the working directory named.ipynb_checkpoints. The checkpoint file enables to recoveranyr unsaved work in the event of an unexpected issue.
Cell Types
There are three cell types in Jupyter Notebooks: Code, Markdown, and Raw.
The default one is Code, which we use for running codes.
Markdown cells are used for Markdown, which is a markup language that is a superset of HTML. In fact, I created this file using Markdown language cells. If you click within the cells of this file, you can see the original markdown text. Markdown is a simple language, that adds formatting elements to plain text. For example, headings are created by adding the # mark (as in # Lecture 1), for bold font use two asterisks, for italic font use a single asterisk, etc. Still, Markdown
accepts standard HTML language, which can add complexity when needed. See several examples in the next section, and to learn more about the syntax of Markdown language please visit follow this link.
Raw cell type are not executed or rendered. They are mainly useful when exporting with nbconvert, since their content is passed through unchanged. These cells are only intended for special use cases.

Markdown Language
The following cell shows examples of Markdown language code, and the cell afterward displays the output of the cell. Note that unlike the code cells that have line numbers on the left, the markdown cells don’t have line numbers.
### Example Heading: This is Level 3 Heading
This is some plain text that forms a paragraph.
Add emphasis via **bold** and __bold__, *italic* and _italic_, or ***bold and italic*** and ___bold and italic___.
Paragraphs must be separated by an empty line.
- Sometimes we want to include lists.
- Which can be indented.
[It is possible to include hyperlinks](https://www.example.com).
1. Lists can also be numbered.
2. For ordered lists.
We can add inline equations using LaTeX code, e.g., $c = \sqrt{a^2 + b^2}$,
and equations in a new line: $$c = \sqrt{a^2 + b^2}$$
Inline code uses single backticks: `foo()`, and code blocks use triple backticks or they can be indented by 4 spaces:
foo()
And finally, adding images is easy: 
Example Heading: This is Level 3 Heading
This is some plain text that forms a paragraph. Add emphasis via bold and bold, italic and italic, or bold and italic and bold and italic. Paragraphs must be separated by an empty line. - Sometimes we want to include lists. - Which can be indented.
It is possible to include hyperlinks.
Lists can also be numbered.
For ordered lists.
We can add inline equations using LaTeX code, e.g., \(c = \sqrt{a^2 + b^2}\), and equations in a new line:
Inline code uses single backticks: foo(), and code blocks use triple backticks or they can be indented by 4 spaces:
foo()
And finally, adding images is easy: 
Summary
In conclusion, Jupyter Notebooks are very useful for learning Python and testing your codes, as well as for sharing Python codes because others can directly see the outputs of the codes, which may include numerical results, graphs, tables, and other visualizations. The notebooks also display any error messages and other important information in the code. For instance, when training neural networks it can sometimes take hours for executing the code. Being able to see all the results and outputs from the models without the need to run the codes is extremely helpful and simplifies collaboration with others.
The following are tips for best practices when working with Jupyter Notebooks:
Don’t forget to name your notebooks, and don’t have several notebooks
Untitled,Untitled (1), etc. in each folder.Provide comments to your code to improve the code readability, and help others understand your code.
Arrange your code into cells, using logical grouping of the code lines.
Keep the cells simple, and don’t put too many functions into one cell.
Try to import all packages in the first code cell of the notebook.
Display the graphs and plots inline, so that they are visible to others.
BACK TO TOP